Deployment Via Continuous Integrationλ︎
Building on the CircleCI build pipeline created so far, the application will be deployed on Heroku if all the tests pass.
A workflow is added to the CircleCI configuration that deploys the application on Heroku from the source code. Heroku packages the application into an uberjar and then runs the application from that uberjar.
When commits in the Clojure project code are pushed to GitHub they are detected by CircleCI and the tests run. If the tests pass then the Heroku deployment stage starts.
TODO: Convert to tools.build approach
The depstar project has been retired (although still works) in favour of the official tools.build approach
Add depstar to build an uberjarλ︎
Use the depstar tool to create a Java archive (jar) package of the application. The deps.edn configuration in the root of the project already contains an uberjar alias for this tool.
:project/uberjar
{:replace-deps {com.github.seancorfield/depstar {:mvn/version "2.1.303"}}
 :exec-fn      hf.depstar/uberjar
 :exec-args    {:jar "status-monitor-service.jar"
                :aot true}}
To try this on the command line:
This will be the same command used in the build script
Create a custom build behaviourλ︎
Heroku build scripts use Leiningen by default. Configure Heroku to build with Clojure Tools, create a custom build file which will run instead of Leiningen.
Create a file called bin/build script in the root of the project
Create an empty project.clj file so that Heroku recognized the project as Clojure.
Define how to run the applicationλ︎
Create a Procfile file in the root of the project directory containing the command to run the application.
Use the $PORT as an argument to the command. Heroku automatically assigns a port number for an application to listen upon when creating a contain in which the application will run. This port number is set using the PORT environment variable and is available to the application on startup. Using the PORT environment variable ensures the Clojure application will receive requests.
Specifying a Java versionλ︎
Create a system.properties and specify the Java version to use for the application. Java 1.8 is the default version use on Heroku, however, our development environment is Java 17, so add a property to set the Java runtime to version 17.
Heroku configurationλ︎
Login to the Heroku dashboard and create a new application.
In the Heroku dashboard, open the application Settings and add a Config Vars using the name CLOJURE_CLI_VERSION with a value of 1.10.1.727

CircleCI configuration with Heroku Orbλ︎
Edit the .circleci/config.yml file and add the heroku orb and a workflow to call the orb task. The workflow has a dependency on the build job, so that will take place first.
The Heroku workflow will build the application from source code using the heroku/deploy-via-git. Only changes pushed to the live branch of the GitHub repository will be used in the Heroku deploy workflow.
Feature branches can be deployed on Heroku by creating an additional Heroku application and push the branch to it. Or use Heroku pipelines
version: 2.1

orbs:
  heroku: circleci/heroku@1.2.6 # Invoke the Heroku orb

workflows:
  heroku_deploy:
    jobs:
      - build
      - heroku/deploy-via-git: # Use the pre-configured job, deploy-via-git
          requires:
            - build
          filters:
            branches:
              only: live

jobs:
  build:
    working_directory: ~/build
    docker:
      - image: cimg/clojure:1.10
    environment:
      JVM_OPTS: -Xmx3200m
    steps:
      - checkout
      - restore_cache:
          key: status-monitor-service-{{ checksum "deps.edn" }}
      - run: clojure -P
      - save_cache:
          paths:
            - ~/.m2
            - ~/.gitlibs
          key: status-monitor-service-{{ checksum "deps.edn" }}
      - run: clojure -X:test/run
CircleCI Environment Variablesλ︎
Open the CircleCI and select project settings > Environment Variables
Add environment variables to define where the Heroku application can be found and a token to provide access.
| Environment Variable | Value |
|---|---|
HEROKU_API_KEY |
name of the application created on Heroku |
HEROKU_APP_NAME |
API key found in Account Settings > API Key |
Push changes to trigger buildλ︎
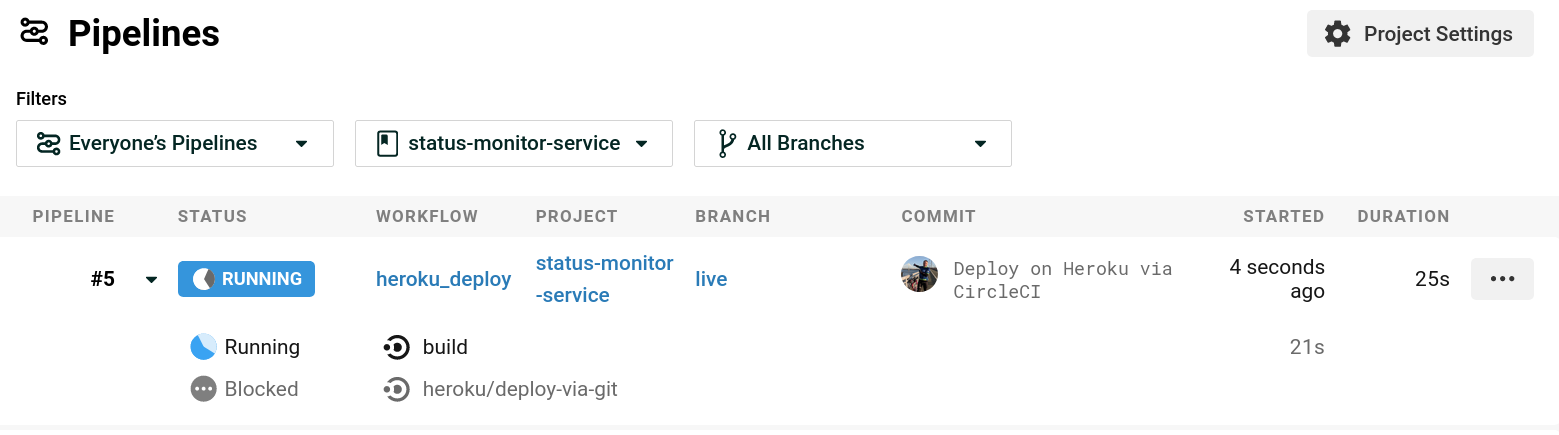
Commit the changed and push them to the GitHub repository. This triggers a build by CircleCI. The build downloads the dependencies and runs the unit tests. If the tests pass, then the Heroku deploy workflow starts.
The two stages can be seen in the dashboard as the pipeline runs.
Now visit the deployed Heroku application to see it in action.
Troubleshootingλ︎
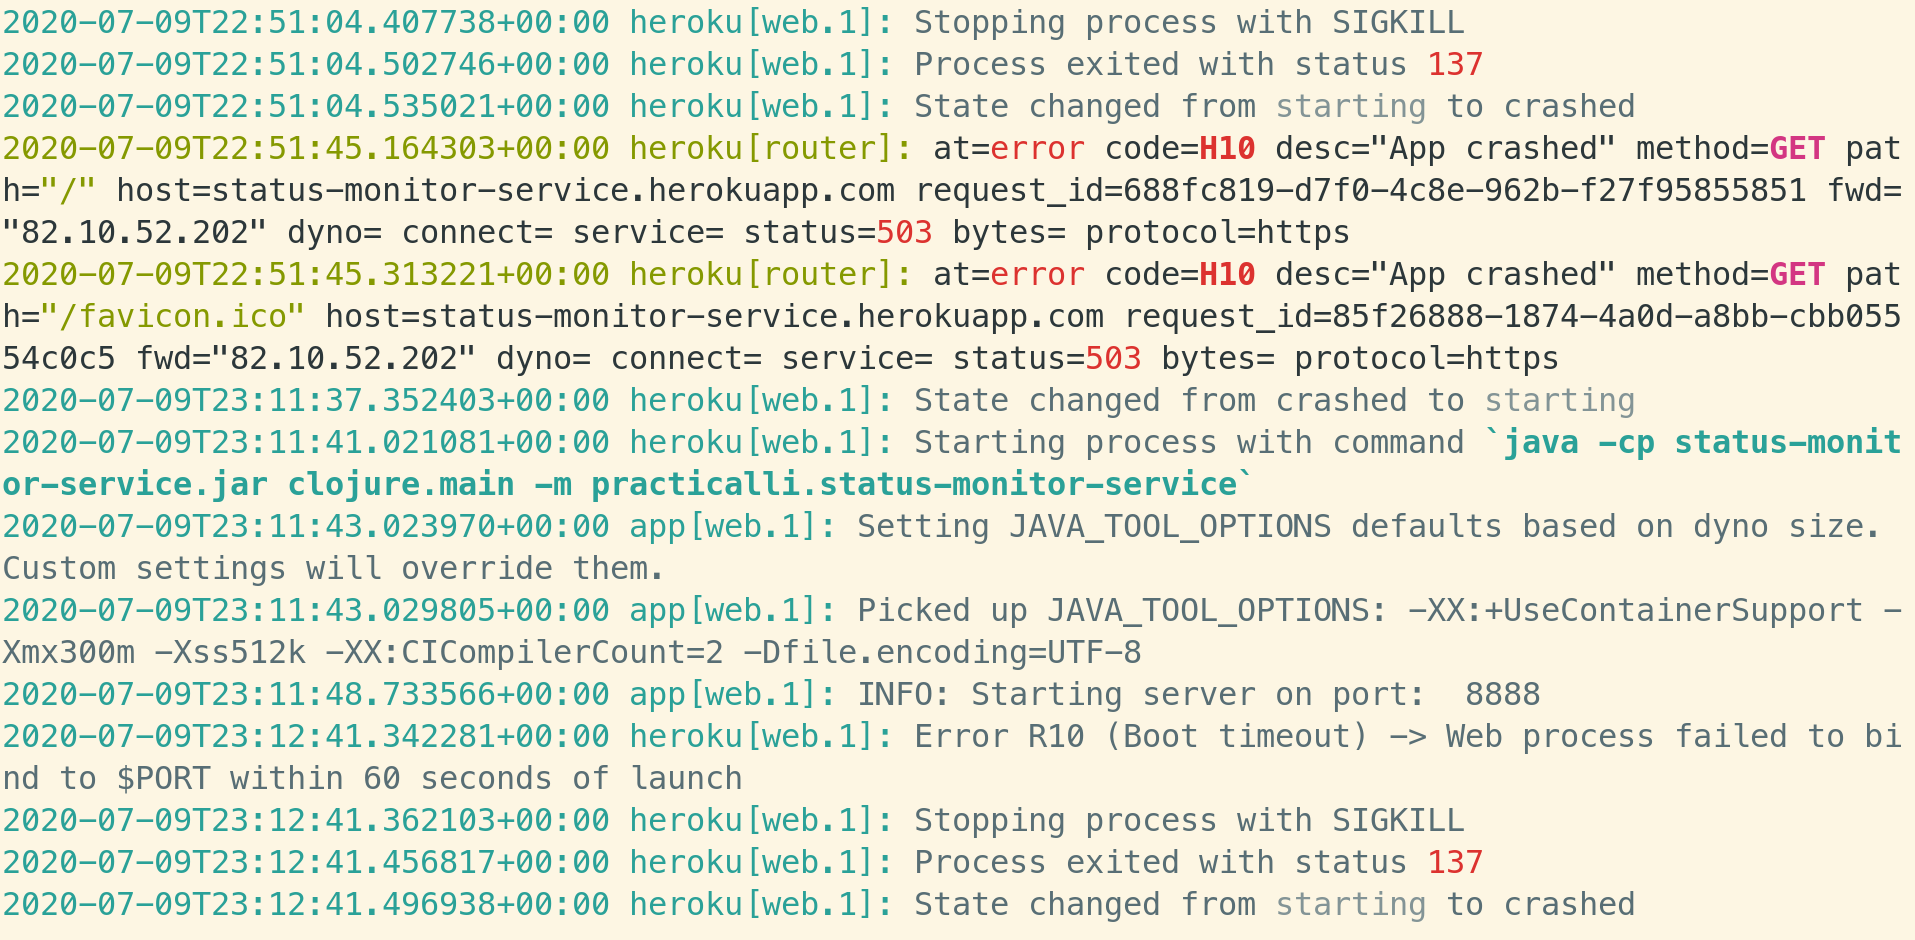
If there are issues, then use the Heroku toolbelt to look at the logs. In a command line terminal, issue the login command which opens a web browser to login to Heroku. Once logged in, run the heroku logs command to view the latest logs
The logs can also be viewed live, as the application is being deployed by including the --tail option when running the heroku logs command in a terminal
The example Heroku logs show that the status-monitor-service is using the default port number if non is supplied as an argument, rather than Heroku assigned port. Heroku therefore considers the application as unresponsive and sets it status to crashed, tearing down the container the application is running in.
These logs were generated before adding the $PORT to the command in the Procfile.
No forced pushesλ︎
Heroku doesn't like force Git pushes coming via CircleCI.
To get around this, either don't do force pushes to GitHub, or add the Heroku repository for the project as a remote to local git repository.
Heroku repository details in heroku dashboard Settings under App Information
Changes can now be pushed, ideally using force-with-lease to Heroku repository.
Heroku only builds from a branch called master or main, so the above command pushes the local
livebranch to the remotemasterbranch on Heroku.
Stopping the applicationλ︎
An application can be run for free on Heroku with the monthly free credits provided. However, to make the most out of these free credits then applications not in use should be shut down
Run the following command in the root of the Clojure project.