Ubuntu install on Lenovo X1 Extreme 2nd Gen with RAID
A successful installation of Ubuntu 19.10 on the Lenovo X1 Extreme (gen2) laptop, configured with 2 solid state hard drives configured for RAID-0 with LLVM encrypted partitions. , along with The laptop is configured with 32Gb memory and 2 SSDs in RAID-0 configuration for speed
This laptop will be used for real-time video encoding for the Practicalli broadcasts via YouTube as well as doing some data science in Clojure.
This was a very smooth installation and all the hardware works correctly. The nVidia open source drivers and WiFi adaptor did cause a little extra work, so I have included tips and troubleshooting guides to help you resolve these issues quickly.
Getting the Ubuntu Install
Download Ubuntu server 19.10 iso image to have the option of setting up RAID across multiple SSD's. If RAID is not required then just use the Ubuntu desktop 19.10 distribution.
There is little point in configuring the Intel Rapid Raid in the BIOS as Linux software raid (mdadm) is much better.
Use the Startup Disk Creator application on Ubuntu to burn the Ubuntu server image to a 1Gb USB memory stick Boot computer, press Enter for boot menu, F1 to open bios configuration
Configure the Bios
Switch on the computer and press Enter when you see the prompt to interrupt the system startup. Press F1 to enter the BIOS configuration.
Make the following changes to the BIOS
Disable Secure Boot: NVIDIA Drivers are not signed which makes Secure Boot interrupt the boot processit when it attempts to verify these drivers are trusted.
Disable Windows 10 fast startup if dual booting Windows and Linux. When enabled it builds hibernation files on Windows reboot instead of a normal compuer shutdown.
Ubuntu can crash when loading the default (open source driver). Consequently we will blacklist it and installing the NVIDIA proprietary driver which works fine.
Save changes and reboot
Ubuntu server install
Follow the Ubuntu server install guide with the following additional steps.
Temporarily Blacklist Ubuntu’s Nouveau NVIDIA Driver
In the GRUB menu press E to edit the command to boot the operating system
Type nomodeset at the end of the linux line
The Prevents the system from loading the Nouveau graphics drivers which cause issues and may hang the computer. The Nouveau drivers will be permanently blacklisted once Ubuntu server is installed.
Section 8: Configure Storage - RAID
If you have two solid state drives (SSD's) in the laptop you can configure a redundant array of disks (RAID).
RAID requires two or more unformatted partitions (ext4 and xfs partitions cannot be used). Partitions used in a RAID should have the same size partition.
Its not possible to boot from a RAID partition, so we need a separate partition for /boot
From the Configure Storage menu, select manual to open the partition editor
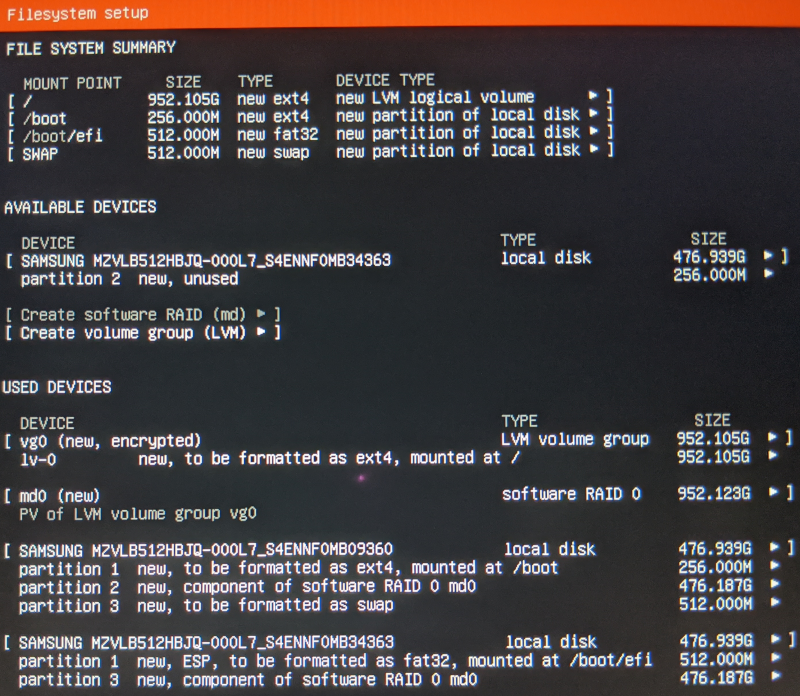
The following steps were used to create a raid array with logical volume management and encrypted disks.
- delete all existing partitions (wipes the Windows recovery partition too - only do this if you never want Windows)
- create 250 Mb unformatted partition on each disk
- create 476.939 Gb unformatted partition on each disk
- create a RAID 0 partition using the two 476.939 Gb partitions (use RAID 1 if you want redundancy rather than speed/size)
- create LVM on raid partition, set encryption on the disk (prompted for password when ever you boot the computer)
- Format one of 250Mb partitons and set mount point to /boot
- [optional] Format the remaining 250Mb partition how ever you want. I left it unused
Follow the rest of the Ubuntu server install guide and reboot when finished.
Use RAID-0 (striping) for maximum speed, allowing data to be written to both SSD storage devices in parallel. Use RAID-1 (mirroring) for redundancy as data is copied to both storage devices.
If RAID-0 fails then it will not be possible to access any data, however, the whole space on the disk is available. RAID-1 is safer as even if one partition or disk fails, then data can still be accessed.
All my development work, documments and configurations are saved to the cloud (usually multiple services), so even if one SSD should become corrupt, I would not loose any work.
Installing a desktop environment
The Ubuntu server does not install a desktop environment by default, but has access to all the same packages so its easy to add one.
Once the server is rebooted, login with your new account name and password. This account has access rights to install software and configure the server using the sudo command.
Blacklist Nouveau driver to avoid conflicts
Open up terminal and enter the following linux commands:
sudo bash -c "echo blacklist nouveau > /etc/modprobe.d/blacklist-nvidia-nouveau.conf"

sudo bash -c "echo options nouveau modeset=0 >> /etc/modprobe.d/blacklist-nvidia-nouveau.conf"
Confirm the content of the new modprobe config file:
cat /etc/modprobe.d/blacklist-nvidia-nouveau.conf

blacklist nouveau
options nouveau modeset=0
Install the nVidia closed source drivers
The closed source nVidia drivers get the most out of the graphics card in the laptop.
The ubuntu-drivers command show you which drivers are recommended for your given hardware
sudo ubuntu-drivers
The same command can be used to automatically install the recommended driver.
sudo ubuntu-drivers autoinstall
Install desktop environment
Gnome is the default desktop environment for Ubuntu. To install, use the following command
sudo apt install ubuntu-desktop
There are other desktop environments available. List them using the command
apt-cache search --names-only desktop

ubuntu-desktop - The Ubuntu desktop system
ubuntu-desktop-minimal - The Ubuntu desktop minimal system
cinnamon-desktop-environment - Cinnamon desktop environment - full desktop with extra components
desktop-base - common files for the Debian Desktop
neurodebian-desktop - neuroscience-oriented distribution - desktop integration
ros-desktop - Robot OS desktop metapackage
autopilot-desktop - Autopilot support for the ubuntu Desktop platform
autopilot-desktop-legacy - Autopilot support for the ubuntu Desktop platform
budgie-desktop - Desktop package for budgie-desktop
budgie-desktop-minimal - Minimal desktop environment for Ubuntu Budgie
kde-plasma-desktop - KDE Plasma Desktop and minimal set of applications
kubuntu-desktop - Kubuntu Plasma Desktop/Netbook system
lubuntu-desktop - Lubuntu Desktop environment
ubuntu-budgie-desktop - Ubuntu Budgie metapackage
ubuntu-mate-desktop - Ubuntu MATE - full desktop
ubuntu-unity-desktop - The Ubuntu Unity desktop system
ubuntukylin-desktop - The Ubuntu Kylin desktop system
ubuntustudio-desktop - Ubuntu Studio Desktop Package
ukui-desktop-environment - UKUI Desktop Environment (metapackage)
vanilla-gnome-desktop - Vanilla GNOME metapackage
xubuntu-desktop - Xubuntu desktop system
Use the command apt-cache show followed by the package name to see a description of that package.
Issues
The nVidia driver issue is well known and solutions shared. There was an unexpected issue with the WiFi. It was unexpected because it wasn't actually an issue at all.
Update the firmware
If you have a custom build of the laptop it probably has the latest version of the firmware. Pre-built laptops may not have the latest firmware version.
It is prudent to check anyway and you can see if there is an upgrade for your hardware using the fwupdmgr command
sudo fwupdmgr update

(on the latest version, 0.1.27)
WiFi adaptor not recognised
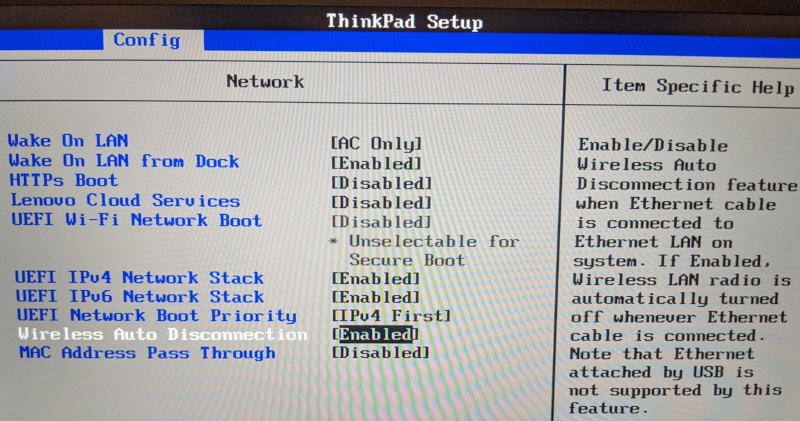
If you have a Lenovo Ethernet adaptor plugged in (not the USB type) then WiFi is automatically disabled. Unplug the Ethernet adaptor and WiFi hardware is automatically enabled (no reboot required). Plugging the Ethernet adaptor back in will shut down the WiFi hardware, saving power.
If you are still having issues, ensure you are using kernel version 5.0.18 or greater (Ubuntu 19.10 has 5.0.23 at time of writing)
Start diagnosing the issue with the lspci command to see what hardware is detected.
lspci | grep -i network

jr0cket@whitestar:~$ lspci | grep -i network
52:00.0 Network controller: Intel Corporation Device 2723 (rev 1a)
Then check to see if the network hardware is actually working. The following was done with the Lenovo Ethernet adaptor plugged in, so disabling the WiFi hardware.
iwconfig

wlp82s0   IEEE 802.11  ESSID:off/any
          Mode:Managed  Access Point: Not-Associated   Tx-Power=off
          Retry short limit:7   RTS thr:off   Fragment thr:off
          Power Management:on

lo        no wireless extensions.

enp0s31f6  no wireless extensions.